Gradient PCR Planner for annealing temperature optimization
A Gradient PCR Planner helps you test several annealing temperatures in one PCR run. You use the same DNA template, primers, polymerase, buffer, MgCl₂ concentration, dNTPs, and reaction volume. You change only the annealing temperature across different tubes or wells.
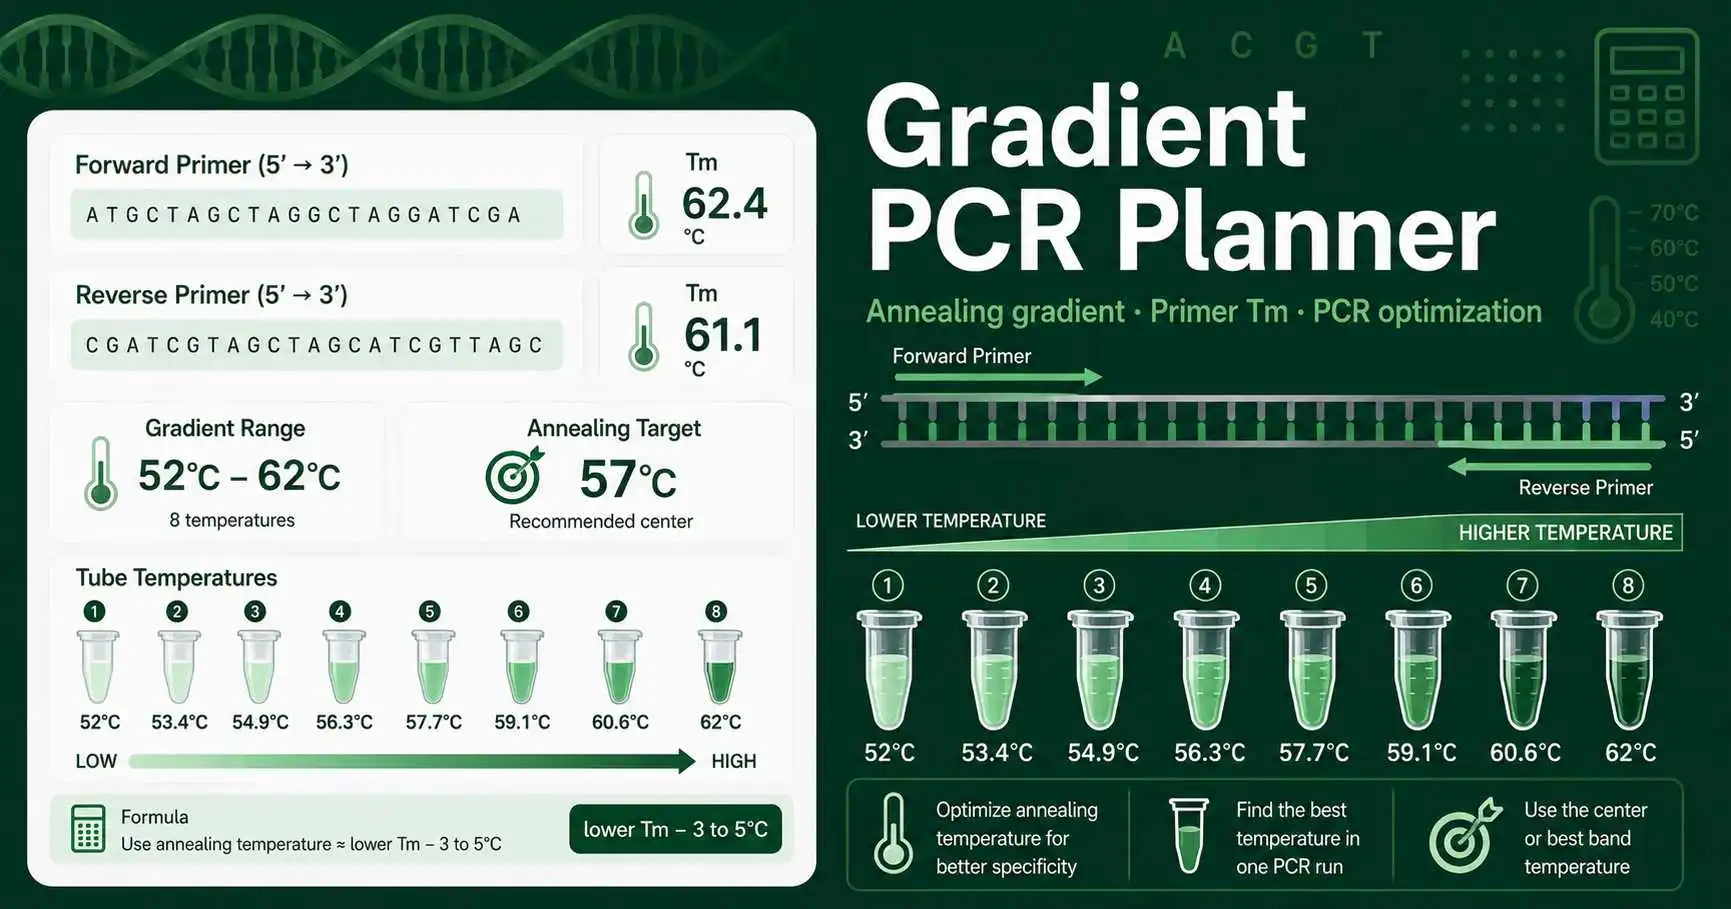
This tool estimates the melting temperature of the forward primer and reverse primer. It then uses the lower primer Tm to suggest a practical annealing target and a gradient range. The output table shows each tube temperature, so you can set up a thermocycler gradient block with less guesswork.
How to use the Gradient PCR Planner
Paste the forward primer and reverse primer in 5′ to 3′ direction. Use only A, C, G, and T. Choose the number of tubes or wells you want to test. Then enter the gradient span, such as 8°C, 10°C, or 12°C.
The planner calculates a lower Tm, a target annealing temperature, a start temperature, an end temperature, and a tube-by-tube series. Use the temperatures as a planning guide. Then confirm the exact gradient settings on your PCR machine, because gradient blocks may not heat every column in perfectly equal steps.
Gradient PCR formula and practical equation
A common first estimate places the annealing temperature a few degrees below the lower primer Tm. This tool uses the following planning equation by default:
Target annealing temperature = lower primer Tm − selected offset
Gradient start = target annealing temperature − half of the gradient span
Gradient end = target annealing temperature + half of the gradient span
Example: if the forward primer Tm is 61°C and the reverse primer Tm is 59°C, the lower Tm is 59°C. If you choose an offset of 4°C, the target annealing temperature is 55°C. With a 10°C gradient span, the planner suggests 50°C to 60°C.
Worked example for a new PCR assay
Imagine a student designs primers for a 450 bp PCR product. The forward primer has an estimated Tm of 62°C. The reverse primer has an estimated Tm of 60°C. The lower Tm is 60°C.
The student chooses an annealing target of 56°C and an 8-tube gradient from 51°C to 61°C. After gel electrophoresis, the 51°C and 52.4°C tubes show extra bands. The 56.7°C and 58.1°C tubes show one strong expected band. The 61°C tube shows a weak band.
In this case, 57–58°C is a sensible next annealing range. The student can repeat PCR at 57°C or run a narrower gradient around 55–59°C for cleaner optimization.
Use case 1: reducing non-specific PCR bands
Non-specific bands often appear when the annealing temperature is too low. Primers bind to partially matched template regions, and the polymerase extends unintended products. A gradient PCR run helps you find a higher temperature that still amplifies the correct product.
Start with a moderate gradient around the calculated target. Choose the tube with the expected amplicon size and the fewest extra bands. If every tube has extra bands, check primer specificity, magnesium concentration, cycle number, and template quality.
Use case 2: recovering weak PCR amplification
Weak amplification can happen when the annealing temperature is too high, primer concentration is low, template quality is poor, or the target region is difficult to amplify. A gradient PCR test can reveal whether a lower annealing temperature improves yield.
If only the lowest-temperature tubes amplify, the primer pair may need redesign or a lower annealing temperature. If all tubes are weak, review the master mix, DNA input, extension time, polymerase choice, and primer integrity.
How to choose the best gradient PCR result
Do not choose the brightest band automatically. Choose the temperature that gives the strongest correct-size band with the least background. A slightly dimmer clean band is often better than a very bright lane with several non-specific products.
For cloning, choose a temperature that gives a single clear band. For diagnostic or teaching PCR, choose a condition that works consistently. For qPCR primer screening, use gradient PCR as an early check, then verify efficiency with a standard curve.
Gradient PCR and related primer checks
Gradient PCR works best when primer design is already reasonable. Before running the gradient, check the primer pair with the Primer Tm Calculator. If you are still preparing the reaction setup, use the PCR Master Mix Calculator to plan reagent volumes.
NEB PCR optimization guidance notes that a temperature gradient can be used to optimize annealing conditions, and some NEB protocols describe starting a gradient near the calculated Tm range.NEB PCR Optimization
Common mistakes in gradient PCR planning
Do not change multiple variables at the same time. If you change annealing temperature, MgCl₂, template amount, and cycle number in one experiment, you cannot tell which variable improved the result.
Do not ignore primer Tm mismatch. If the forward and reverse primers differ by more than about 5°C, the PCR may need a wide gradient or primer redesign. A matched primer pair usually gives cleaner optimization.
Do not assume every thermocycler produces identical gradient values. Read the instrument screen and record the actual temperature for each column or tube. Use those recorded values in your lab notebook or student report.